AliveColors is all-in-one graphics software for detailed image editing and retouching, high-quality photo enhancement, creating stylization effects as well as professional painting and drawing.
Watch our video tutorial to learn more about the workspace of AliveColors image editor.
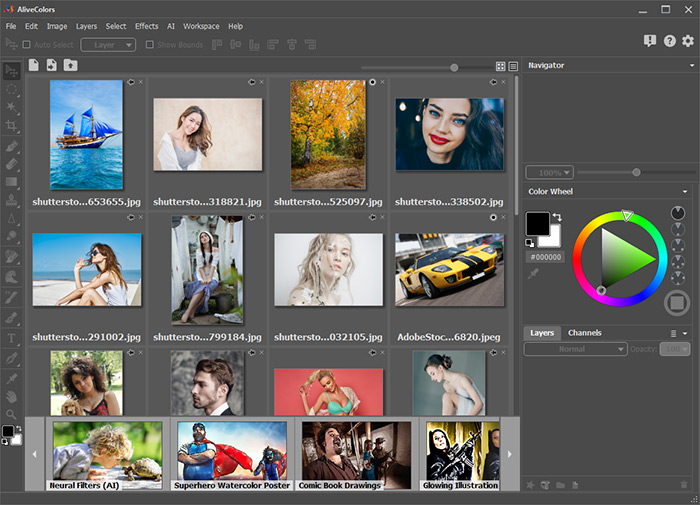
Run AliveColors. Right after the launch of the image editor, its workspace looks like this:
 Start Screen of AliveColors Image Editor
In the central area of the software window, the Start Screen is shown.
At the top of the screen there are the following controls:
 - the button opens the dialog box for creating a new image;
 - the button creates a new document from the clipboard;
 - the button opens the file dialog, where you can select an image from the disk.
The central area of the start screen is the list of recently opened documents. You can view documents as thumbnails ![]() or a text list
or a text list ![]() .
.
The size of the thumbnails of the recently opened images can be adjusted using the slider at the top of the start screen.
When you click the  button next to an image, it will turn into
  , and the image will be pinned in the list and will not be lost when opening other images. Press the button again to unpin the image.
When you click the  button next to an image, it will be deleted from the list.
At the bottom of the start screen there is the Learn Panel where you can find links to video tutorials for working with the editor.
Hint: You can enable or disable the Start Screen and the Learn Panel in the editor's Preferences.
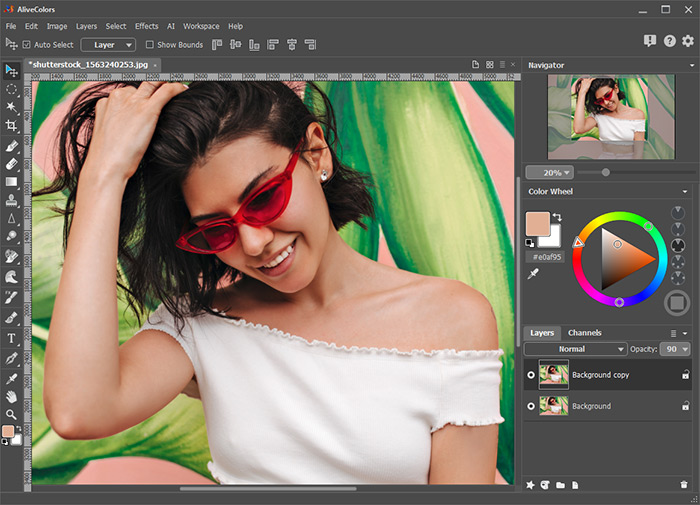
After opening an image, the editor's workspace will look as follows:
 Workspace of AliveColors
Elements of the Program Window:
The main part of the program's window is taken by the Image Window.
It's possible to open multiple images at the same time. Each image appears in a separate tab at the top of the Image Window. You can switch between the images by clicking on the tab name.
 Image Tabs
To the right of the image tabs, the following buttons are found:
![]() - the button creates a new file;
- the button creates a new file;
![]() - the button shows thumbnail previews of opened files;
- the button shows thumbnail previews of opened files;
![]() - the button displays the list of opened images;
- the button displays the list of opened images;
![]() - the button closes an active file.
- the button closes an active file.
Right-click the tab bar to open the context menu with available commands.
In the upper part of the program's window, you can see the Control Panel with the following menu options:
The File menu contains basic commands to manage files: Open, Save, Print, Close, Exit, etc.
Using the Automate command, you can process multiple files at once.
The Preferences... command opens the program settings dialog box.
The Edit menu is used to edit the content of a document and the history of changes.
The Image menu allows you to adjust the scale, size, and color mode of an image. It also offers commands for tone and color adjustments.
Assign Profile. The command replaces the profile with the selected one without affecting the data. Visually, the image will change, but the data at each point will remain the same.
Convert to Profile. The command replaces the profile with the selected one, the data is recalculated, but the visual image does not change.
The Layers menu contains commands for working with layers.
The Select menu contains commands for working with selections.
The Effects menu contains a number of enhancement and stylization filters and effects. Here you can find a list of built-in and installed plugins.
The AI (Artificial Intelligence) menu contains neural filters designed to improve images.
The Workspace menu controls the appearance of the program. It offers the following commands and menu items:
The Customize Workspace command allows to edit the workspace properties.
The Panels menu item defines which panels are displayed in the program window.
The alignment commands (Rulers, Grid, Guidelines, and others) are used to arrange and align layers and objects.
The Help menu provides information about the program. The menu provides the following items:
Tutorial. The command opens the User Manual (F1 key).
About AliveColors. The command displays information about the current version and license of the program.
Activation. Using the command, you can register the program and change the license type.
What's New? The command opens a web browser window providing information about new versions of AliveColors.
Technical Support. Use this command to contact AKVIS Support Team.
AliveColors on the Web. The command opens the home page of the graphics editor.
Subscribe to AliveColors News. Use this command to subscribe to AliveColors Newsletter and stay tuned with the latest news!
About Plugins. Select the name of any plugin to get information about its version and the status of your license.
Under the Control Panel there is the Tool Options panel with the parameters of an active tool.
 Options Panel of the Move Tool
The Tool Options panel shows the basic parameters of the tool. To display all parameters, click on the tool icon on the left side of the Tool Options or right-click within the Image Window.
In the right part of the Tool Options panel you can see the following icons:
The button  opens a window showing the latest news about AliveColors.
The button  opens the help files of the program.
The button  calls the Preferences dialog box that allows to change the program's options.
The program contains some panels with specific functions: Navigator, Toolbar, Color, Swatches, Color Wheel, History, Actions, Layers, Channels, Selections, and File Info.
The parameters of the selected effect or adjustment layer are shown in the Settings Panel.
The Hints panel displays a short description of the panels, tools, and options when the mouse cursor is hovering over them.
The panels can be easily moved, combined, scaled, aligned, and hidden.
