The Levels adjustment is used for correcting the tonal range and color balance of an image by adjusting the brightness of its shadows, midtones, and highlights. Watch our video tutorial to learn more about the Levels adjustment.
Display the parameters of the Levels adjustment by selecting Image -> Adjustments -> Levels...
You can also use the Levels adjustment layer (Layers -> New -> Adjustment Layer -> Levels...) which will affect the underlying layers without changing their content.
 Levels
Settings and Controls:
The Input Levels section displays a histogram showing the initial distribution of brightness in the image.
Above the histogram there is a channels drop-down list. You can either adjust each channel separately, or use the composite color channel.
The right edge of the histogram represents pixels having the maximum brightness (white points). This point corresponds to the white slider. If the histogram does not reach the right side, there are no white pixels in the image. When you move the white slider to the left, the point against which the slider is located will assume the maximum brightness (255) and the pixels having this value will become white. The brightness of other pixels will be re-calculated accordingly. The image will get lighter.


(hover the mouse over the picture to see the original image)
The left side of the histogram indicates the point of minimum brightness (black). This point corresponds to the black slider. If the histogram does not start at the left end, the image does not have any black pixels (brightness = 0). When you move the black slider to the right, the point against which the slider is located will assume the minimum brightness value. As a result this tone will become black, while other pixels will be re-calculated accordingly. The image will get darker.


(hover the mouse over the picture to see the original image)
The middle slider defines the tone of the image that will have the brightness of 128 (middle-gray tones). If you move the slider to the left, the mid-gray tones become lighter; if you move the slider to the right, the mid-gray tones become darker.


(hover the mouse over the picture to see the original image)
Using  ,
,  , and
, and  you can select the white, black, and middle-gray points directly from the image, respectively. The values will vary for each color channel, so choose a neutral gray image area as a sample. Otherwise, the image will be tinted.
In the Output Levels section, you can specify the range of brightness which affects the stretching of the range of input levels.
If the range of output levels is less than the range of input levels, the image becomes softer. Otherwise, the contrast will be increased.
By pressing the Auto button, the software adjusts the range of input levels automatically. The automatic correction affects only the levels of the separate color channels.
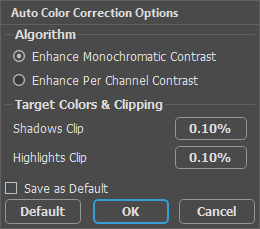
Click the Options button to open the Auto Color Correction Options dialog box.
 Auto Color Correction Options
Enhance Monochromatic Contrast clips all color channels using the same settings for each channel. As a result, the shadows become darker and highlights become lighter. This algorithm is applied when using the Auto Contrast command.
Enhance Per Channel Contrast adjusts the color channels individually. The values of black and white pixels for each color channel are changed by different amounts. The resulting image can be tinted. This algorithm is applied when using the Auto Levels command.
The Target Colors & Clipping section displays the percentages of white and black pixels which will be removed from each end of the range.
Save as Default check-box. If the check-box is enabled, the specified parameter values will be used as default when using the Auto command.
Fixed Preview Area check-box. When the check-box is enabled, all changes are displayed in a small area indicated by the dotted line. When the check-box is disabled, the changes are applied to the area visible in the Image Window.
Click Default to restore the default values.
Click OK to apply all changes and close the dialog box.
Click Cancel to close the dialog box without applying any changes.
