The Curves adjustment allows you to change the brightness and contrast of the entire image or in the local area. Watch our video tutorial to learn more about the Curves adjustment.
Select Image -> Adjustment -> Curves... to display the adjustment settings.
You can also use a Curves adjustment layer (Layers -> New -> Adjustment Layer -> Curves...) which will affect all underlying layers without changing their content.
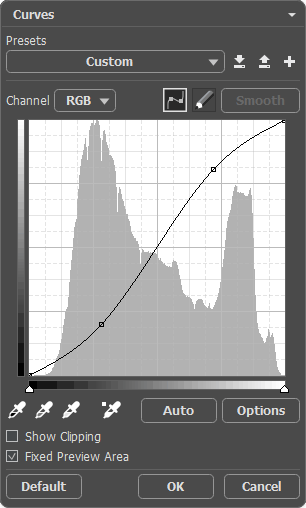 Curves
Settings and Controls:
Most of the dialog box is covered by the curves graph. You can adjust the curves either in each color channel or using in the composite channel. Select the desired channel in the Channel drop-down menu above the graph.
By default, the curve is a straight line having a slope of 45o and it does not reflect any changes. When you move any section of the curve above the diagonal line, the corresponding area of the image becomes lighter. When you move it below the diagonal line, the corresponding area becomes darker.
When you drag the entire curve above the diagonal line, the entire image becomes lighter. When you drag the entire curve below the diagonal line, the entire image becomes darker.
 Curve Above the Diagonal Line
 Curve Below the Diagonal Line
You can edit the curve in two ways:
In the mode ![]() you can modify the curve by setting and dragging the control points.
you can modify the curve by setting and dragging the control points.
In the mode ![]() you can draw a curve. Click Smooth to make the drawn curve appear smoother.
you can draw a curve. Click Smooth to make the drawn curve appear smoother.
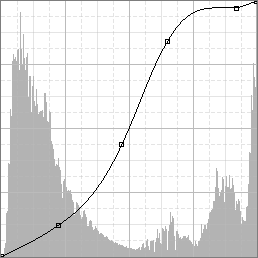 Edit Points to Modify the Curve
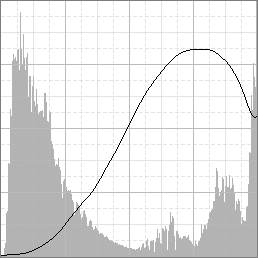 Draw a Line
If you modify the graph using the control points, you can add extra points to the curve by clicking on it with the left mouse button.
Moving the points at the top of the curve adjusts the highlights. Moving the points in the center of the curve adjusts the midtones, and moving the points in the bottom section of the curve adjusts the shadows.
To delete a point, right-click it or drag it off the graph.
Note: Do not add too much points to the curve, as it can cause image artifacts.
Specify the darkest and lightest values in the image using the sliders under the curve and these tools  ,
,  . The tools can edit the curves in each component channel but not in the composite channel.
Note: When using the tools  and
and  , all previous changes will be lost! Use them at the beginning of the correction.
 Modifying White Point
 Modifying Black Point
Using the tool  , you can modify the white balance in the image. Click with the eyedropper on a neutral gray area of the image. The curves of the color channels will be adjusted accordingly.
Note: The tool  should be used after the other two, otherwise the middle gray value will be cleared.
With the tool  you can apply the adjustment directly on the image. Hold down the left mouse button over the image and drag the mouse up to lighten and down to darken this image area. Press the mouse button to create a new point on the curve. Move the mouse to bend the curve at this point.
Show Clipping check-box. If the check-box is checked, the Image Window emphasizes areas with loss of detail in shadows or highlights. To see the loss in highlights, click the white point slider. To see the loss in shadows, click the black point slider.
Note: The Show Clipping check-box is available only in RGB mode.
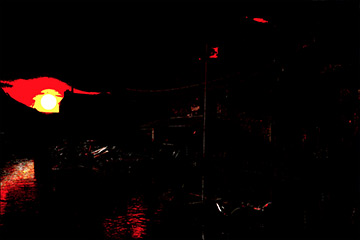 Loss in Highlights
 Loss in Shadows
The color loss is indicated by color pixels on black or white background. Red pixels indicate red channel clipping, green pixels indicate green channel clipping, and blue pixels indicate blue channel clipping. Other colors show clipping in multiple color channels. You can analyze clipping in the composite channel or individually in each color channel.
Press on the Auto button to adjust the curve range automatically. The auto correction settings affect only the curves in the individual color channels.
You can adjust the auto correction parameters by clicking on Options.
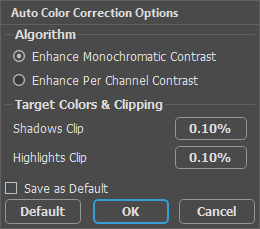 Auto Correction Settings
Choose an Algorithm:
Enhance Monochromatic Contrast - clips all color channels using the same settings. As a result, the shadows appear darker and the highlights appear lighter. The Auto Contrast command uses this algorithm.
Enhance Per Channel Contrast - clips the color channels individually. The values of black and white points differ for each color channel. The resulting image can be tinted. The Auto Levels command uses this algorithm.
The Target Colors & Clipping section displays the percentages of white and black pixels which will be removed from each end of the range.
Save as Default check-box. If the check-box is enabled, the specified parameter values will be used as default for the Auto command.
Fixed Preview Area check-box. If the check-box is enabled, the parameter changes are displayed in the small area bounded by the dotted line. If the check-box is disabled, the changes are shown in the area visible in the Image Window.
Click Default to restore the default values.
Click OK to apply all changes and close the dialog box.
Click Cancel to close the dialog box without applying any changes.
