
Using the Blur menu commands, you can blur the entire image or just a selected area, reduce its sharpness, amount of noise, as well as create a variety of effects.
The program offers the following blur types:
Gaussian Blur. When this method is selected, the program recalculates the color components (red, blue, and green) for every point of the image, taking into account the corresponding values of the neighbouring points; as a result the points change their colors. The calculation is based on the Gaussian distribution and is named after it. In this way the values of the color components are averaged and the contrast between them weakens. The sharp borders are blurred without general lightening or darkening. The image gets dim, "cloudy".
The Radius (0.1-250.0) parameter adjusts the strength of the effect application. It defines to what extent a point influences on the neighbouring points when its color components are being recalculated. At low values only the adjacent points will be changed. Every point will undergo a slight change, but the blurring will be visible. The higher the value of the parameter, the wider is the influence area of every point. The image will get more blurred till it becomes completely indiscernible and looks like one stain (at high values of the parameter).
 Radius = 10
 Radius = 50
Motion Blur. This blur method imitates the straight line motion of a camera.
Parameters:
Angle (0-180). This parameter sets the inclination angle of the line, along which the effect will expand to the image. The values of the parameter vary between 0 and 180 degrees. At exactly these values the blurring will be horizontal. At value = 90 the blurring will be vertical.
Distance (1-500). This parameter defines the effect application area in pixels (relative to every point of the image).
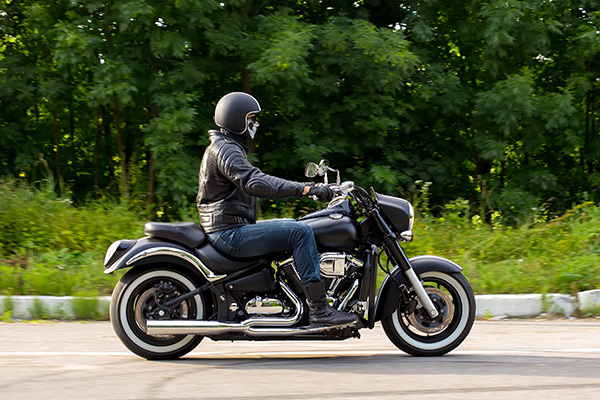

(hover the mouse over the picture to see the original image)
Radial Blur. This method imitates motion, too. There are two kinds of motion:
Zoom. This mode creates blurring directed away from the center.
 Radial Zoom Blur
Spin. This mode imitates the effect of a camera rotating around the central point of the image, which results in circular blurring.
 Radial Spin Blur
The rotation angle in the Spin mode and the effect application area in the Zoom mode can be adjusted using the following parameters:
Highlights (1-100). The parameter specifies the amount of blur in light areas. The higher the value, the deeper light blurred pixels penetrate the dark areas.
Shadows (1-100). The parameter specifies the amount of blur in dark areas. The higher the value, the deeper dark blurred pixels penetrate the light areas.
 Spin Blur in Light Areas
 Zoom Blur in Dark Areas
In the Blur Center section, you can determine the position of the central blur point. To set the position, click the image with the tool ![]() or enter the center coordinates in the fields X and Y.
or enter the center coordinates in the fields X and Y.
Smart Blur. The effect allows you to precisely control the blur.
Radius (1-20). The parameter defines how far the filter searches for dissimilar pixels to blur.
Threshold (0.1-50.0). The parameter allows you to specify how much pixels should differ in order not to get blurred.
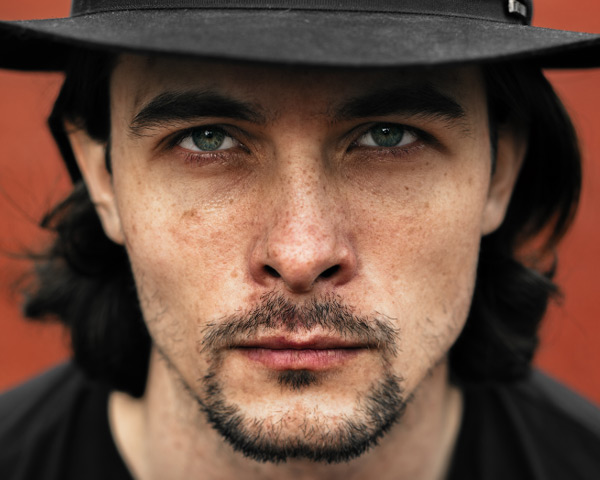

(hover the mouse over the picture to see the original image)
Surface Blur. The effect blurs monochrome image areas while preserving edges.
Radius (0.1-20.0). The parameter specifies the size of the area sampled for the comparison of pixels.
Threshold (0.0-100.0). The parameter determines how much the neighboring pixels should diverge from the center pixel in order to get blurred. Pixels with a difference of less than the threshold value are excluded from the blur.
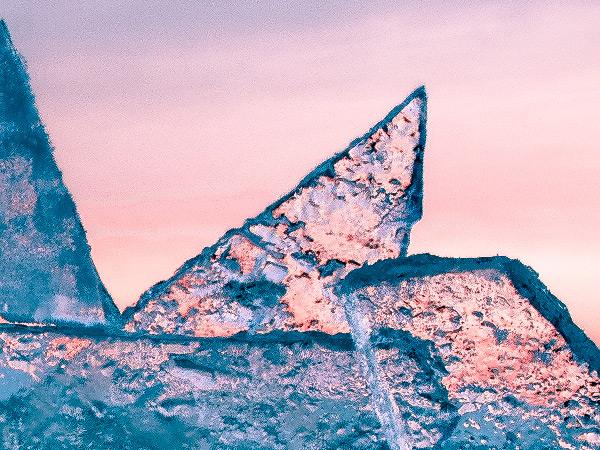

(hover the mouse over the picture to see the original image)
Lens Blur. The effect blurs the image by simulating the narrower depth of field. In the blurred area you can observe the bokeh effect.
 Lens Blur
The Iris Blur effect allows you to accentuate a specific object in an image and blur the rest. The light spots in the out-of-focus area can turn into bokeh.
 Iris Blur
Tilt-Shift adds the effect of a miniature, toy-like scene to your image. The light spots in the out-of-focus area can turn into bokeh.
 Tilt-Shift
Effect Parameters (equal for the last three effects):
Select a mode of displaying the parameter changes:
Fast Preview - this option lets you try the settings on a smaller copy of the original image.
Full Processing - the image in its original size will be processed with the chosen parameters.
The Blur (1-100) parameter lets you adjust the strength of the blur effect. The higher the value, the greater the blur is.
 Blur = 5
 Blur = 15
All light spots in the out-of-focus region take the form of bright glare. Use these parameters to adjust the look of the spots of light in the blurred area:
Bokeh Shape Parameter Group.
Shape. Click the square button in the Settings Panel and select a shape from a list. All light spots in the out-of-focus area will change in the selected shape.

 Bokeh Shapes
Smoothness (-100..100). At the value = 0, the spots of light have the selected form. The higher the value, the more the edges of the light spots are blurry and out of focus. When decreasing the value, the center of the light spot is blurred and becomes more transparent. At the lowest value, the only contours of the shape remain visible.
 Smoothness = -75
 Smoothness = 75
Deformation (-100..100). When the parameter is set to 0, the light spots have a polygonal shape. The higher the value, the more the edges of the polygon are curved outside, making it gradually look like a circle. The less the value, the more the edges are retracted inside the shape, turning the polygon into a star.
 Deformation = -50
 Deformation = 50
Rotation (0-360). The parameter defines the rotation angle of the polygon around its center.
 Rotation = 0
 Rotation = 45
Note: Deformation and Rotation parameters are disabled for the circle shape.
Glow Parameter Group.
Brightness (0-100). As the parameter increases, the brightness of the light spots increases.
 Brightness = 25
 Brightness = 75
Saturation (0-100). The parameter increases the color saturation of light spots. The parameter is associated with the Brightness parameter. The higher the Brightness, the more saturated colors you can get.
 Saturation = 25
 Saturation = 75
Range (0-255). The parameter specifies the brightness range of light spots to which the first 2 parameters will be applied.
 Range = 165/185
 Range = 235/250
If the Fixed Preview Area check-box (not available for the last three blur effects) is enabled, all changes will be displayed in a small preview area. If the check-box is disabled, the changes will be applied to the area visible in the Image Window.
Click Default to restore the original settings.
Click OK to apply the changes to the image and close the effect dialog box.
Click Cancel to close the dialog box without applying changes.