
The Perspective Crop tool ![]() combines two operations into one – correcting perspective and cropping. The tool can be used to fix perspective distortions, which can occur when taking pictures of wide or tall objects with a camera at an angle to the subject.
combines two operations into one – correcting perspective and cropping. The tool can be used to fix perspective distortions, which can occur when taking pictures of wide or tall objects with a camera at an angle to the subject.

(mouse over the image to see the original image)
Activating the tool creates a crop frame that encloses the entire image. Select an area you want to keep by dragging the cursor while holding left mouse button.
If there is an active selection on the image, then the crop frame will cover the selection area.
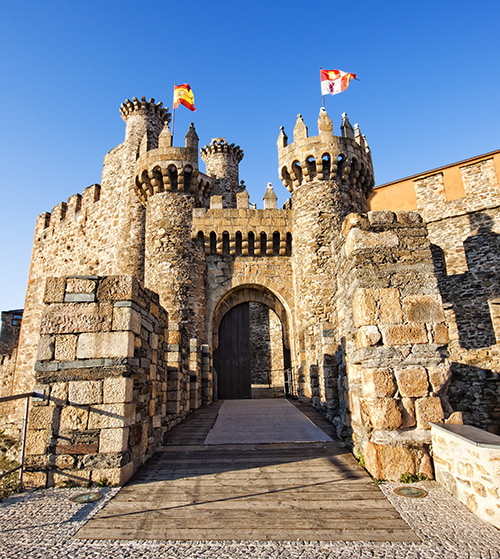
 Initial Crop Area
Drag the corner markers to change the perspective of the contour. When moving the markers, it is necessary to ensure that the sides of the frame become parallel to the sides of the object being corrected.
Hint: Blue markers on the frame indicate where the top of the cropped photo will be.
 Modified Crop Area
The basic tool settings are shown in the Tool Options panel above the Image Window. To display the full list of parameters, press the tool icon ![]() in the Tool Options panel or F5-key.
in the Tool Options panel or F5-key.
In the Width, Height, and Resolution fields, specify the final dimensions of the cropped image. If values are zero, the final image dimensions will be determined automatically.
In the Trim section, specify the method for creating the crop area:
Manual. A crop frame is created manually using the mouse cursor.
Trim Alpha. A crop frame will be created based on the contents of the alpha channel.
Trim Selection. A crop frame will be created based on the contents of the selection channel.
Top Left Color. Areas having the same color as the upper left pixel in the image will be placed outside the crop frame.
Bottom Right Color. Areas having the same color as the lower right pixel in the image will be placed outside the crop frame.
You can select the side from where to crop the picture: Top, Bottom, Left, Right. This option is disabled for the selected Manual mode.
External Area. The check-box helps to facilitate visualization of the crop frame. If the check-box is enabled, the outer parts are highlighted in a selected color.
 External Area check-box is disabled
 External Area check-box is enabled
Show Grid. When the check-box is active, a grid is displayed above the crop area, which helps when adjusting the crop frame.
To complete the perspective cropping, click OK or press the Enter key. After that, the crop area will convert to a rectangular shape, and everything outside the frame will be deleted.
Cropped Image