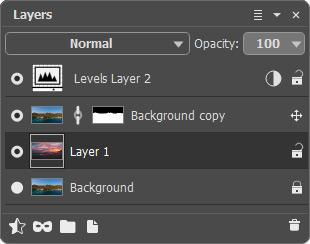
The Layers panel lets you work with layers (sets of pixels which can be edited separately) and groups of layers.
 Layers Panel
The panel contains a list of layers. It remains empty until you open an image or create a new document.
The active (editable) layer is highlighted in gray. To select another layer, click its name or thumbnail. To select multiple layers, click them while holding down Ctrl. To select multiple contiguous layers, click the first layer and then Shift-click the last layer.
To rename a layer, double-click the layer's name next to it's thumbnail, then type a new name and press Enter.
You can change the thumbnail size by pressing the button ![]() at the top of the Layers panel.
at the top of the Layers panel.
To the left of a layer’s thumbnail is a visibility icon ![]() /
/![]() , which allows you to turn the visibility of a layer on or off. Editing tools cannot be used on a layer when its visibility is turned off. To toggle a layer’s visibility, left-click the icon.
, which allows you to turn the visibility of a layer on or off. Editing tools cannot be used on a layer when its visibility is turned off. To toggle a layer’s visibility, left-click the icon.
Note: The layers contained in a group are visible only if the group’s visibility is turned on (regardless of the visibility of separate layers).
There are several layer types:
Raster Layer is a basic layer type which allows applying brushes and filters. Other layers can be rasterized by using the Rasterize Layer command.
Adjustment Layer is marked with an ![]() icon to the right of the layer name. This layer contains the result of an adjustment being applied. Click the mark to open the Adjustment Layer settings panel.
icon to the right of the layer name. This layer contains the result of an adjustment being applied. Click the mark to open the Adjustment Layer settings panel.
Shape Layer is marked with a ![]() icon to the right of the layer name. This layer type is used to create and edit vector shapes. Click the mark to open the Shape Layer settings panel. The layer is created automatically when using the shape tools.
icon to the right of the layer name. This layer type is used to create and edit vector shapes. Click the mark to open the Shape Layer settings panel. The layer is created automatically when using the shape tools.
Text Layers are used to add inscriptions to images. They are created automatically when using the text tools.
Smart Object is a container layer that can contain layers of any other type. It preserves the original data, allowing for non-destructive image editing.
You can change the order of the layers by dragging them up and down in the panel.
Right-clicking on a layer opens a menu of commands. The available menu items depend on the layer type and the number of selected layers.
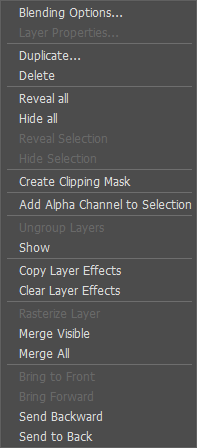
Blending Options. The command opens the blending options dialog box.
Layer Properties. The command opens the separate parameter menu of an adjustment or a shape layer.
Duplicate. The command creates a copy of the selected layer or group of layers. You can copy the layer to a new document as well as to an open document. The copy direction can be set in the dialog box. You can copy the selected layer or group of layers by dragging it with the mouse while holding down the Shift+Alt keys on Win (⇧+Options on Mac).
Also, you can copy the layer to another image by moving the layer icon to the open document tab.
Delete. The command deletes the selected layer or group.
Layer Effects. The submenu contains commands for working with layer effects.
Smart Filters. The submenu contains commands for working with smart filters.
Layer Mask. The submenu contains commands for creating and working with a raster (pixel) layer mask.
Vector Mask. The submenu contains commands for creating and working with a vector mask.
Convert to Smart Object. The command converts a layer, multiple layers, or a layer group into an embedded smart object. This command also converts a linked smart object into an embedded smart object.
Smart Objects. The submenu contains commands for working with smart objects.
Create/Release Clipping Mask. The command adds the selected layer to a clipping mask or removes the layer from it.
Add Alpha Channel to Selection. The command creates a selection which combines the alpha channel with the selection channel.
Subtract Alpha Channel from Selection. The command creates a selection which includes all the selection channel contents excluding the alpha channel.
Intersect Alpha Channel with Selection. The command creates a selection which includes the common parts of the alpha channel and the selection channel.
Group Layers. The command combines selected layers into a group.
Ungroup Layers. The command quickly separates layers from the selected group.
Show/Hide Layers. The command enables/disables the displaying of contents of layers/groups.
Rasterize Layer. The command converts any layer to a regular (raster) layer.
Create Path from Text. The command creates a vector path from the active text layer.
Convert to Vector Shape. The command converts the selected text layer to the shape layer.
Merge Layers. The command merges the selected layers into a single layer.
Merge Group. The command merges visible layers of the group into a single layer. The new layer is placed in the main list instead of the group. Invisible layers disappear.
Merge Clipping Mask. The command merges all layers of the clipping mask into one raster layer.
Merge Visible. The command combines all visible layers into one layer.
Merge All. The command combines all visible layers, discarding the invisible ones, into one layer.
Bring to Front. The command moves the selected layer to the top of the list.
Bring Forward. The command swaps places between the selected layer and the layer above it.
Send Backward. The command swaps places between the selected layer and the layer below it.
Send to Back. The command moves the selected layer to the bottom of the list.
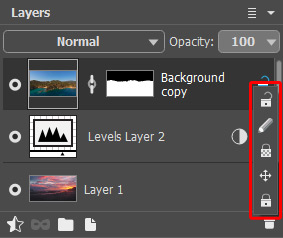
The Lock icon next to each layer prevents the layer from further editing. Click on the icon to select a lock mode.
 Lock Modes
Unlock ![]() - this icon means the layer is in an unlocked state (editable).
- this icon means the layer is in an unlocked state (editable).
Lock Image Pixels ![]() protects the opaque pixels of a layer from any changes made by drawing/editing tools.
protects the opaque pixels of a layer from any changes made by drawing/editing tools.
Lock Transparent Pixels ![]() (only for raster layers) prevents changes to the transparent pixels.
(only for raster layers) prevents changes to the transparent pixels.
Lock Position ![]() prevents a layer from being moved.
prevents a layer from being moved.
Lock All ![]() prevents any changes to a layer.
prevents any changes to a layer.
Double-click a layer’s thumbnail to open the Blending Options menu. Close the menu by pressing Esc (changes will be ignored) or by clicking outside of the menu window (changes will be saved).
The Blending Options menu looks like this:
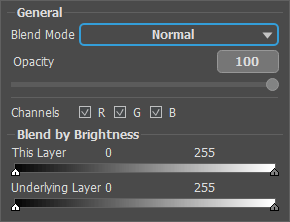
Blend Mode determines how the pixels on one layer are blended with those on the layer below it.
Opacity (0-100) affects the visibility of other layers below the selected layer. If a layer has an opacity of 0%, it will be completely transparent (invisible). The intermediate opacity value results in partial permeability of the pixels on that layer. At 100% opacity, only the pixels on that layer are visible. Transparent and translucent areas are filled with a checkerboard pattern.
For blend modes other than normal, Opacity affects their influence on forming a blended image.
- Note: Blend Mode options and Opacity parameters are also displayed at the top of the Layers panel and can be adjusted without opening the menu.
Fill (0-100) – layer fill opacity. Affects only pixels, vector shapes, and text; it does not affect the opacity of layer effects.
Channels mode controls independent color channels. Enable the check-boxes to select color channels involved when blending layers.
Blend by Brightness controls the visibility of pixels on the active layer and layers below it based on their brightness.
The buttons at the top of the panel are used as follows:
The Add Effect button  opens the Layer Effects menu. Use its commands to change the appearance of a layer.
The New Mask button  allows you to create a layer mask and a vector mask. Clicking the button once will display a thumbnail of the pixel mask, and clicking it again will display a thumbnail of the vector mask.
The New Group button  allows you to combine multiple layers into one set. When you click on this button in the Layers panel, elements will be created named Group 1, Group 2, etc. By moving a folder you can move all of the layers within it together.
To add a layer to a group, drag it to the folder while holding down the left mouse button and release it when it is above the folder. You can remove a layer from a group in a similar way. If you drag the folder to the  button at the bottom of the panel, a copy of the folder along with its sub-layers will be created.
To group multiple layers, select them and press the  button or use the command Layers -> Group Layers.
To ungroup the layers, select a group and use the menu command Layers -> Ungroup.
To rename a group, double-click on its name, enter a new value and press Enter.
Click on the folder to open/close the group. When a group is opened ![]() , its constituent layers can be moved, deleted, or edited individually. If the active group is closed
, its constituent layers can be moved, deleted, or edited individually. If the active group is closed ![]() , new layers will be created above.
, new layers will be created above.
You can change a Blend Mode for a group of layers. By default, the Pass Through mode is selected for a group in the blend modes list, that is the layers inside the group interact with each other (and the layers below) in the usual way - as if they are not grouped.
When other blend modes are used, the group behaves as if all layers inside it are combined into one layer, which interacts with the layers outside the group based on the chosen blend mode. In this case, blend modes of individual layers in the group are valid only within that group, and have no affect on layers outside of the group.
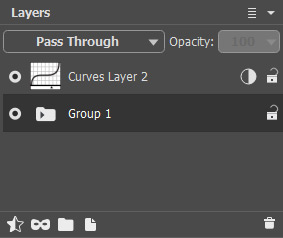 Closed Group
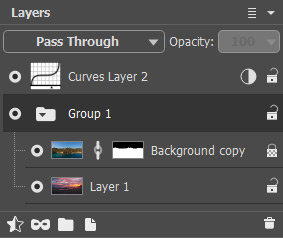 Opened Group
The New Layer button  creates a new layer above the active layer or in the active group. If you drag a layer (or group) to this button while holding the left mouse button and then release the left mouse button, a copy of that layer (or group) will be created. When creating a new layer a pop-up menu appears, letting users specify a layer type - raster, adjustment, or shape.
When choosing an adjustment layer from the list, you can specify what kind of adjustment is required. Adjustment layers contain settings which affect the underlying layers without changing their pixel values.
The settings of the adjustment layers overlap with the settings in the Adjustment menu: Image -> Adjustment.
The Delete button ![]() removes the selected layer/group. Drag a group to this button to delete the group along with all of its contents. If a group is selected, and then the button is pressed, it’s possible to delete the group with or without its contents (your choice).
removes the selected layer/group. Drag a group to this button to delete the group along with all of its contents. If a group is selected, and then the button is pressed, it’s possible to delete the group with or without its contents (your choice).
Note: It is impossible to delete all layers.
