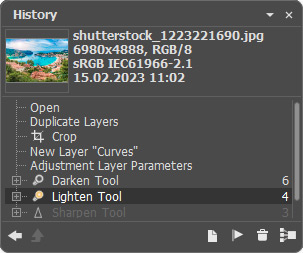
The History panel shows the list of every change made to a file. By clicking on an item in the list, you can revert the file to a previous state.
At the top of the panel, next to the thumbnail of an image, there is information about the file: its name, size (in pixels), color mode, profile, date and time of creation.
 History of Changes
The history of changes is arranged in a linear fashion. This means that if you return to any intermediate state and apply an action, all actions on the list after it will be permanently removed, except for the control points (which will be placed at the top of the list). Selecting Open from the list returns the file to its initial state (before changes were applied).
All changes made are shown with their corresponding icon. Any successive changes made by the same tool (two or more) are arranged in a group; the number of elements in a group is shown by a number to the right of the icon. The list of elements in a group can be collapsed and reopened by pressing the "+" icon to the left of the tool’s icon.
After applying the filter or effect in the program, you can back to it and edit the result. To do this, click the "+" icon in the History panel next to the effect's name and choose Result. The opened Effect dialog box displays the last used settings. After the editing is done, all the subsequent history states are deleted.
The possible number of states in the History panel can be adjusted in the Preferences.
The following buttons are located in the History panel:
Undo/Redo - History State ![]() /
/![]() . The button allows you to switch between two last states in the list.
. The button allows you to switch between two last states in the list.
Exit Artistic Cloning/Deformation Mode ![]() . The button allows you to exit the Artistic Cloning mode of the Chameleon Brush tool or the Deformation mode, applying all changes made in these modes.
. The button allows you to exit the Artistic Cloning mode of the Chameleon Brush tool or the Deformation mode, applying all changes made in these modes.
New Document from Current State ![]() . The button allows you to create a new document using the settings at the current processing point.
. The button allows you to create a new document using the settings at the current processing point.
Create Checkpoint ![]() .
The button allows you to save individual states of the history.
A checkpoint is any document state saved with a default name (Checkpoint 1, Checkpoint 2, etc.) with no history of obtaining that state.
To rename a checkpoint, double-click its name, enter a new value, and press Enter.
.
The button allows you to save individual states of the history.
A checkpoint is any document state saved with a default name (Checkpoint 1, Checkpoint 2, etc.) with no history of obtaining that state.
To rename a checkpoint, double-click its name, enter a new value, and press Enter.
Delete States ![]() . The button allows you to remove all states below the selected one, keeping all checkpoints at the top of the list.
If this button is pressed while a checkpoint is selected, the checkpoint will be deleted.
. The button allows you to remove all states below the selected one, keeping all checkpoints at the top of the list.
If this button is pressed while a checkpoint is selected, the checkpoint will be deleted.
Collapse Group ![]() . The button collapses the list in a group and combines it into one state, removing the individual history of each element.
. The button collapses the list in a group and combines it into one state, removing the individual history of each element.
You can also edit the history using the Edit menu commands:
Undo cancels the last action. If you use this command several times, a series of the last actions will be canceled. The hotkey is Ctrl+Z on Windows, ⌘+Z on Mac.
Redo allows you to restore the canceled action.The hotkey is Ctrl+Y on Windows, ⌘+Y on Mac.
Undo/Redo - History State - this command allows you to switch between the current and the previous state of the document. The command is the analogue of the buttons ![]() and
and ![]() in the History panel. The hotkey is Shift+Z on Windows, ⇧+Z on Mac.
in the History panel. The hotkey is Shift+Z on Windows, ⇧+Z on Mac.
The Purge menu is used for permanent data deletion:
History clears the whole history, except the initial and current states, as well as checkpoints.
Clipboard deletes the contents of the clipboard.
Clear All clears both the history and the clipboard.
Attention: The commands in the Purge menu cannot be canceled!
