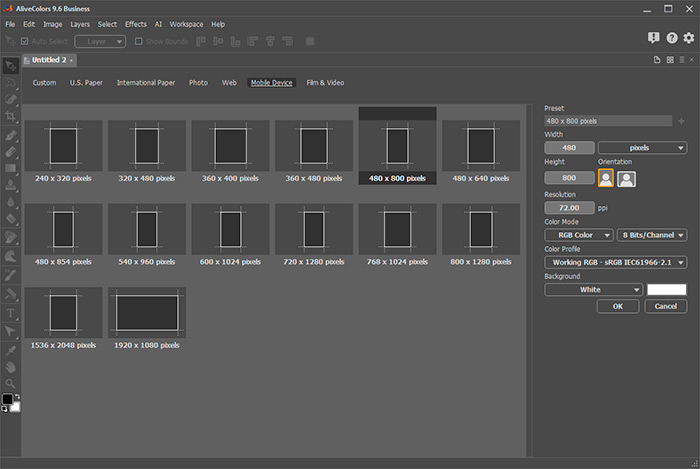
The AliveColors graphics editor lets you create new images from scratch.
To create a new image, select File -> New... in the menu, click  on the start screen, or use hotkeys: Ctrl+N on Windows, ⌘+N on Mac.

Creating a New Image
Select any presets group:
Custom,
U.S. Paper,
International Paper,
Photo,
Web,
Mobile Device,
Film & Video.
After selecting a presets group, presets thumbnails appear in the central window. Choose any preset and, if necessary, adjust the following parameters:
Set the size of the document in the Width and Height fields.
The Units drop-down list shows the units of measurement (pixels, inches, centimeters, etc.).
The Resolution parameter determines the number of pixels in an image (level of detail) and is measured in pixels per inch (ppi).
Choose the Orientation of the document - Portrait ![]() or Landscape
or Landscape ![]() . Portrait orients the image vertically (height is greater than width), while Landscape orients the image horizontally (width is greater than height).
. Portrait orients the image vertically (height is greater than width), while Landscape orients the image horizontally (width is greater than height).
In Color Mode drop-down-list, choose one of the following color schemes: Grayscale, RGB, CMYK, or Lab. The modes differ in how they handle color. After you have chosen a color model, select a color depth from the list below: 8 Bits/Channel, 16 Bits/Channel, or 32 Bits/Channel.
In the Color Profile drop-down list, select a profile for the document being created.
Use the Background option to set the color of the background layer. To use the custom background, select Custom... and choose color in the color selection dialog.
To save the settings as a new preset, click the Save Preset button 
To delete a user preset, select it in the list and click the Delete Preset button  .
.
Click OK to create a new document with the specified parameters.
Click Cancel to close the dialog box without creating a new document.
